Pageviews past week

The cold world of skimo & alpine climbing

The cold world of skimo & alpine climbing
Showing posts sorted by date for query ccw packs. Sort by relevance Show all posts

Wednesday, May 14, 2014

The gear list?

going, going ...gone!


Most won't care.  But a few have asked.   From the many options I have here to ski and climb in what did I take to or end up using full time in Chamonix?  Each was carefully chosen from a lot of options.
Never been to Chamonix when I didn't want to buy or think I "needed" something.  Of course I did eventually!  But this is what I actually used this trip to great satisfaction.  And better yet, never thought I lacked anything for gear or clothing.  I went heavy on ski and could have left the Hauscaran or the GPO at home...but not both.  The other two I used a lot.  Boots as well.  All good choices I'd take again. 

Sunday, March 16, 2014

Ski Packs? Camp USA 260 and 600, Arcteryx Khamski 38


Truth is I am spoiled ("no chit", some of you must say) because I really do have some amazing gear.  And I get exposed to a lot more that isn't so amazing.   Packs in particular for this discussion. Randy at Cold Cold World has indulged me over the last few years by making what I still think is the best climbing sac I have ever used, let alone seen..  And that opinion includes the newest Arcteryx and Patagonia climbing packs along with the no name stuff floating around the Internet as a "alpine pack".   But sadly, a climbing pack is clearly not a ski pack.   It is close mind you but without the ski attachments and the extra "bag" for touring kit you still only have a climbing sack.  Useful but not idea for my own use. 

Thursday, July 18, 2013

Some thoughts on gear..ski specific?

Two pairs of Praxis GPO!


Good gear is a collaboration of the builder, the design team and the end users.

Studying weapons, and climbing gear, which are all just tools really, I've come to one solid conclusion.

The more the end user is involved the better the product.  Seems simple but it only takes a few minutes of looking around at any one piece of gear you use to play with or defend yourself with to see just how connected the end user has been to the design team.  Doesn't matter if that 'tool" is a season old or a several millennium.

The best designs are built to be used with a LOT of influence by the peoples using them!

The closer your requirements are to the designer's/end user's original applications are the better those tools will likely work for you.

I can think of a half dozen designs just off the top of my head that have stood well over the test of time.

New technology can be a really fun thing and make us humans much better with less effort at what we do.

In this case skis are on my mind.   I've been skiing a long time.  The Volant Spatula, DPS 112RP, the Dynafit Broad Peak  all come to mind as game changers for me.   But there are lots of skis out there I never got on.  And lots of skis that likely changed your own skiing.  My original fiberglass ski, the K2 Holiday, changed skiing for me :)

The newest Cho Oyu, the RPC and the Huascaran are current choices that make me wiggle in anticipation for the first snows of winter while I am out enjoying myself on sun warmed alpine rock in mid July.

But I have a couple of new toys you'll be hearing about the next chance I get on some snow. (Mt Hood In July hopefully)  I'm pretty stoked for the obvious reasons.  When the real players are involved, magic happens.  Think CCW packs, the Nomic, Low tech race bindings and the newest Rebel Ultra.

Drew Tabke:

"The story that Praxis Skis has played in my career as a skier cannot be underestimated. Since I started riding their Powder Boards in 2007, they’ve been a steadfast source of support and innovation for me as well as the core group of skiers who support their small brand. Praxis is a puzzle piece that doesn’t always fit in to the makeup of the ski industry. For example, as an athlete it has been difficult to secure sponsorship from binding or boot sponsors without committing to a particular manufacturer’s ski line as well. But I’ve always believed that having access to the innovation and quality that a small brand like Praxis offers is well worth giving up a the visibility and contracts that can come with the bigger brands."

More here:

http://praxisskis.com/custom-skis/drew-tabkes-notes-on-the-gpo/

and here:

http://www.powdermag.com/stories/small-brand-shout-out-praxis/#.Ucjgmy2ygLs.facebook

You can spend  a lot of dollars, hire bright new engineers and designers to little avail.  The guys that can make the stuff work?  Really work for those of us actually using it?  It is the guys/gals deep in the game are the ones that will really make  a difference.  Pity the fool who hasn't figured that one out yet.  And trust me...more that haven't, than those that have.

Wednesday, May 15, 2013

Praxis Skis!


http://praxisskis.com/

One of the many fun things about writing this blog is getting to meet the great people who enjoy what I enjoy.   Hard to believe from reading here and the pictures (ad nauseam) but I  am not really a very social person.

So meeting folks from all over the world in weird places, be it skiing or climbing is always a thrill to me.

The blog also points me in some weird directions for gear.  Which in turn I like to relate to the blogosphere.   

If you haven't noticed I like bespoke clothing and boots, Randy's CCW packs made to order and gear of that quality and attention to detail.  That attention to detail is what makes the best...really the BEST.

Same thing with skiing.  Narrow your own focus and wants in ski gear and you run into similar minds.

Enter Keith Keith O'Meara and his company, Praxis Ski.

"Praxis Skis are “Handcrafted in the Sierra Nevada Mountains.” Our factory is located on the North Shore of Lake Tahoe, where the mountains are our backyard. Our skis are constructed by inspired skiers who take pride in producing the perfect ride for a variety of individual needs and styles. By designing skis that work for you, we aim to elevate the experience of skiing by reducing fatigue and increasing the amount of time you’re on the hill."

I look at the forums and blogs as much as anyone.  And the name Praxis kept/keeps coming up when you are talking skis with hard core users.  Annoying at first, then enough chatter to make me look around again. 


Didn't hurt that Drew Tabke won the World Freestyle Championships on "his" Praxis ski, the GPO,  this year.  I wasn''t  the only one late to the party and now taking notice.   Notes below from 2011.

http://praxisskis.com/custom-skis/tabkes-competition-quiver-of-a-world-title-2011/

But seriously, I like to ski and I aint hucking *anything*.  So what I am looking for may not be what Praxis is selling or what you are looking for.

Gotta love the top sheet colors though!  And seemingly a model for ever use.  Sound familiar?


Then the term..."TOUGH"....keeps coming up, along with "durable and incredible build quality".  Come on?  How long can you ignore that kind of stuff?  I have a friend who destroys numerous brand name skis per season and he'd be lucky to weight in at a buck and a half soaking wet!  He too now wants to get on Praxis.

"As some of you have already heard, Praxis has decided to offer incredible customization options to our entire 2012-2013 lineup. In our continual pursuit to progress the sport of free skiing by providing the most progressive and well-built, handcrafted skis out there, we want to offer folks a custom ski experience like no other."

*Ok, that got my attention!*

http://praxisskis.com/custom-skis/praxis-customization/

"A Guide to Praxis Customization:

*** The ski specifics shown and references to weight and flex are for the standard “stock” models. Depending on chosen custom options, specifics may change.

How to Order your Praxis Custom Skis:

Step 1: Choose your model and length. Please feel free to contact us with any question or for advice on what model is best for you.
Step 2:Decide what topsheet option you would like. We have 4 options available.
A) You can order the ski as shown on the website
B) You can pick any graphic from our graphic library at no extra cost. Choose “graphic from library” on order form and add one of the graphic options from the library to your shopping cart. If you have more than 1 pair of skis on an order simply make a note on the order form what graphic goes with what ski.
C) You can create and submit a custom graphic! Give your ski a one-of-a-kind look that you created. Click here for more info on how to create a graphic to fit your ski. This option has an additional cost of $175.
D) Top your ski with a real-wood veneer. We have 2 different types of wood veneers available; Birdseye Maple and Bubinga. This option has an additional cost of $250. Testing over the past couple years with these wood veneer tops has gone really well as they are probably the most durable topskin option we have used and in our opinion look the best. To order a wood veneer topsheet select “wood veneer” from the top sheet design drop-down menu on the order form, and make a note on the order form what type of veneer you would like.
Step 3: Choose your preferred flex. Please feel free to contact us for advice on the best flex for you. You have the option from 4 different ski flexes. See below to our number flex system in reference to the soft, medium, medium/stiff, and stiff options.
Soft = 5 – 6 Medium = 6 – 7 Medium/stiff = 7 -8 Stiff = 8 +
We recently used our flex testing machine to test the flex of some common industry skis, here’s what we found."

Yep, I am a sucker for "custom" even when I don't know exactly what I do need, I often know what I don't.   Add in good customer service.  And the fact that I'm very much in tune with my Scotch heritage.  Praxis allows a 50% down and 30 days to settle the bill, makes buying a custom ski even easier than lay away at your local brick and mortar store.   I have two pair coming.  Hard to squeeze a nickle out of me.  Few companies can manage that.  But those that have...actually earned it.

More to come shortly on my personal choices in custom Praxis skis.


Tuesday, February 5, 2013

Winter Climbing in the Eastern Sierra, 2012-13


There is indeed more to the climbing here than the very popular stuff.  Perhaps more than most regions, winter climbing activity in the Eastern Sierra is veryconcentrated.  On a busy weekend Chouinard Falls can have eight or more ropes hung across its width.  The final weekend of “calendar winter” on Whitney’s Mountaineer’s Route can see hundreds of climbers.  Not to mention, of course, the bouldering scene around Bishop. The rest of the range may see fewer alpine climbing visitors in
winter than a single weekend on Whitney. 

However, there is a contingent poking around after suitable winter routes.  Most classic routes have seen first winter ascents, and then very few, if any.  Winter cragging has been, remarkably, limited to the fat flows in Lee Vining Canyon and a handful of more obscure falls.  In general, High Sierra climbing has operated through history in hushed tones.  These truths leave the contemporary winter climber feeling adventurous and exploratory. 

This winter has provided excellent conditions for winter climbing.  In early December, a heavy, wet storm plastered the mountains with a coat of base snow. 
The Minarets in rare rimed conditions. Closed roads, but still thin snow-base made access too difficult to access. There would have been a day or two of awesome rime climbing for the motivated.


Ian McEleney and I got out around that time to take advantage of the drippy and decidedly Cascadian conditions.  First, some “wet-tooling” near thin, early-season ice flows.
Ian on Luke L’s newly bolted dry-tool route “Jango Fett” (M8 or M7 or easier... I on-sighted the 2nd ascent, and I’m no M-rock star) in the Narrows of Lee Vining Canyon. A couple handfuls of newly developed dry-tool routes grace the compact granite walls of this approach-hallway. How many ice climbers have carried their spikes right past opportunities here? How many have climbed without spraying? 


http://mountainproject.com/v/narrows---right/107473474


Same day, a little later. Decidedly un-Sierra-like wet snow. Contrary to popular belief, here on the high and dry side of the Sierra we are more accustomed to lighter snow.

Ian and I got out again the very next day on “the Eiger of the Sierra”.  Mt. Morrison dominates a climber’s view of the range in the Mammoth Lakes area. Morrison has one of the best peak-bagger’s routes anywhere, an imposing NE face, a few radster ski lines, and a reputation for real crappy rock.  I love Mount Morrison.  With a plowed trailhead right at the base and the heavy plaster-coat of
snow, a scouting mission to the North Ridge seemed in order.  We had ridiculously windy conditions, but otherwise found a classic, metamorphic ridge in great shape. Rumors of loose rock were not unfounded, but somewhat exaggerated.  In short, this ridge is fully worth the effort for a winter climber. 
Ian low on the North Ridge of Mt. Morrison.
The metamorphic experience is unique for us Sierra-spoiled
scramblers. 


Given that this is primarily a gear review and discussion blog, it wouldn’t do to gloss over what experienced Sierra ridge practitioners are carrying for a day like this.  Truth is, I can’t speak to exactly that.  But I can tell you what Ian and I carried.  With 5000 feet of vertical relief and most of that relief at least mildly technical, pack weight is crucial.  A day like this reveals the truth in the
oft-quoted Exupery maxim: “Perfection is achieved, not when there is nothing more to add, but when there is nothing left to take away.” As you can see below, we didn’t come even close to perfection, given what percentage of our pack weight we didn’t use. 
 
Critical gear considerations:

Boots: Silver Trangos for me, some sort of orange boots for Ian.  He’s since “seen the light” and now owns a pair of Trangos. Packs:  I rock a CCW Ozone, basically stock.  Ian now has his own as well, with CT-approved customizations.  Indeed, Ian has copied me twice already in this list. But that’s where it ends.  I won’t even open Pandora’s box of lessons he’s taught me.  Rope and rack:  30m, couple cams, few stoppers.  Never used. Light axe each:  Camp Corsa for me, Grivel something-or-other for Ian. One pair of Darts between us.  Never used.  Light, go-fast clothes.  Crux for both of us was sealing pant/boot interface without gaiters and/or crampon straps.  The now “standard” practice of an instep bungee was inadequate for the big post-holing descent.  Any reader tips?  I know, I know, maybe full gaiters have their place, but it’s tough to reverse the vanity...

Lightweight emergency kit.  More than first aid, but not much more. 


Higher, dancing with slivers of sun.  Wind and cold
conspired to make the sun little more than a photo-enhancer.


Even higher, another bit of sun, and the Great Basin desert beyond.

Lee Vining Canyon has long been California’s ice climbing headquarters. Beta here:
 
Chouinard’s well-known early instructional piece shows photos of climbing and training in the drainage that shades a frozen fall bearing his name.  Countless climbers, between sunny boulder sessions, big-time ski mountaineering endeavors, and 5-days-a-week in one of the Golden State’s countless industries, have learned, do learn, and will learn, their icy trade here. Busy weekends at LVC prompt a cringe from even the most dedicated climber.
Ian on Plumb Line on the Main Wall, LVC. With fat ice and fat bolts, who’s to blame folks for mobbing Lee Vining Canyon?  Find a mid-week day, get there early and stay late, and crowds won’t be a problem.  Show up at 10am on a holiday Saturday and all bets are off...
Avoiding the crowds and getting as much sun as you can safely get while Cali ice climbing.  Late afternoon refraction on the Main Wall. 
 
Yet another crowd-avoidance strategy:  Rocking out on the
locker-tool-cams-in-a-blank-shallow-corner, pull-up-party that is “Carless Torque”.

Ian and I grabbed a day for each of us to clean up some old projects.  He ticked off a scrappy mixed line right of the main flow on Chouinard Falls and then we swung leads on the mega-classic,  “Heel Toe”.
Topping out pitch 1 of Heel Toe.
 
Ice and mixed climbing and splitter granite.  Indeed folks,
this is the same batholith that underlies Tuolumne Meadows and into which Yosemite
Valley has cut.  This alone is worth the price of admission.

It seems that each winter I climb with just one partner the entire season.  This winter it is Ian.  Ian and I both guide, climb at similar standards, have similar aspirations and have remarkably similar backgrounds.  We are both new to dry-tooling and mixed climbing and have appreciated reviews and gear recommendations from this site.  Perhaps more than anything else, Ian isn’t afraid to try and fail big.  I too love trying and failing big.  Well, the love of failing is a complicated love.  But isn’t all love that way?  Anyway, there’s nothing like a buddy that will invest it all (and has a lot to invest) in some harebrained mission.  One day in mid January this year we set out to tackle such an endeavor.  We’ll keep the details few and the photos fewer.  It can be summed up thusly...
So much promise... (and no, that’s not where we were headed)

And so much punishment. (and no, we don’t recommend that amount of post-holing, especially up hill, and especially early in the day when psyche is so vulnerable. Lesson: Given the choice, post-hill downhill and toward home. Obvious, right. I wish we could claim to be “thinking outside the box”.)


Needless to say, we didn’t send that day in Rock Creek.  We have, together, failed on larger endeavors with greater heartache.  Individually we have come up short on even larger undertakings.  We will keep trying, keep sending, and keep failing.  I wish you all the same!

About the author:  Jed Porter climbs, skis and lives in the Eastern Sierra of California.  He works full-time, year-round as a guide there. 
 
Check out his website
at    http//www.jediahporter.com

Monday, February 4, 2013

Piton Hybrid? It is true...

Happy Man in a Piton Hybrid.


You know when you are talking gear with a designer and he complains (only a little mind you) that his original design has now been some what usurped by a new product, that there is something to  it.
Especially if you liked the original and really like the newest "version" even more.

In this case the Patagonia Piton Hybrid Piton Hoody was the topic of discussion.  The product that it closely resembles is the R1 Hoody.  I own and use both.

But seldom, if ever, can I remember making two blog posts in such a short amount of time on a single product.  I recently bought 2 more on the Internet at retail!  And now my wife has one as well.  It is a Patagonia insurgency here!  Weird that, as I am not generally a big fan of Patagonia. 

But when one piece of clothing rapidly becomes my choice for everything from a fast ski run, to an alpine ice climb, bank the fact it is a good piece of outdoor clothing.  Way better than first impression might leave you with. When I want to watch TV in mine  (yes I admit to it, I watch TV on occasion) I know something is up.  When I can run on a wet and miserable day in it...BC ski in it with out a shell......well you get the idea.  Most anything I do I might want to use a Piton Hybrid.   No thumb holes which I like.  But long sleeves.  Great hood.  Water and wind resistant inserts and a long, well fitted body.  Full zip.  One chest pocket.  And super comfortable as a base layer, mid layer or even a outer layer.  How many pieces of clothing that can  do all three for you with little or no compromise?

Few pieces of gear have impressed me this much. Phantom 6000 with Baruntse liners, the Nomic, CCW packs, the TLT.  Nothing in clothing I'd add to the list.  And we all know I like much of the the current clothing lines.

Piton again, with no shell required, on a mid winter summit.


More here:
http://coldthistle.blogspot.com/2013/01/patagonia-piton-hoody.html

Monday, January 21, 2013

Cold Cold World and Dynafit?


Have I ever mentioned how much I really appreciate the quality of my CCW packs and Dynafit gear?

If not...since I had such a great weekend with both I'd like to share some of the stoke!
"Gear I never notice!"  How cool is that?
Their packs, skis, bindings, pants, boots, shells, sweaters, skins, gloves, it all makes my happy hit parade list.  You'll see more of it all when I and my co-authors get more time to write. 


http://www.coldcoldworldpacks.com/

http://www.dynafit.com/en

Thursday, May 10, 2012

Climbing Packs part 4

Steve House on the N. Face of Alberta, April of 2008
Custom CCW pack made to order.  photo courtesy of Vince Anderson 

http://www.skywardmountaineering.com/


Screen snap shot from a video featuring Colin Haley in the Spring of 2011, Chamonix,
Patagonia prototype pack, no lid.  Same pack Colin and Mikey Shaefer used on Devil's Thumb.  And the pack Colin used in lectures for show and tell here in Seattle. 

http://colinhaley.blogspot.com/2010/08/devils-thumb-diablo-traverse.html

http://www.colinhaley.blogspot.com/

http://vimeo.com/23577174


This is the last blog in a 4 part series on climbing packs.  It really isn't fair of me to emphasize the fact of just how good basic packs are with pictures of Steve House, Colin Haley, Vince Anderson and Mikey Schaefer all using similar type packs for their own climbing.  There are dozens of other pack manufactures out there and lots of extremely good alpinists using much more complicated packs.  I have nothing to gain from promoting these simple pack ideas.  And the same pack ideas were around when I started climbing, long before Twight, House or Haley began their own adventures.   

But these guys are picky about their own gear and can use or have anything they want made.  Which for me means it is likely worth paying attention from time to time to what they are using.


You need to look close in the left hand margins of this picture but Vince Anderson's pack on Alberta is there as well.

Steve with the lid on while on Alberta.

photos courtesy of Vince Anderson

http://www.skywardmountaineering.com/


But the pack style isn't just for the super stars.  Here is another set of packs I mentioned previous.  Stock CCW Ozone on the left in red ballistics cloth and a custom CCW climbing pack on the right in the Spectra grid.  Good side by side size comparison for volume. 


packs and photo courtesy of Ryan@bfmgs

http://bigfootmountainguides.com/2012/04/13/the-perfect-climbing-pack/

More here:

http://www.larsonweb.com/backpacks/id1.html

And finally two more custom CCWs.  My stripped version that weights in at 22oz.    My point here is don't believe the ad hype.  When you start looking at climbing pack weights  make sure you actually weigh your choices or go to someone you can trust to give you the weights.  I have listed most of the major players in the blog at some point.  

Five, 60 meter ropes in this one and 30#

Even at 22oz my custom version is a amazingly tough in Spectra and not a tiny pack.

Nastia's  new, custom version of the Ozone with a 17" back sewn up in Spectra ripstop with compression straps, crampon patch and straps with a lid attached on the left.   It weighs in at 28oz with the lid, removable foam back pad and all.   Nastia's  custom Ozone is a much smaller pack than my 21"  backed custom CCW.  Which makes perfect sense as I am 6'1" and she is 5'4".

In the alpine, where this style of pack excels. 
Photo courtesy of OlegV


Michael Wejchert's  custom Cold Cold World Ozone loaded for late-season ice climbing.  "Inside are boots, extra layers, two water bottles, and my puffy. Under the lid are my crampons and helmet. I love how the lid stretches to accommodate a helmet or rope." 


Lid in the pack..easy. 

The tool attachment system: shock cord, essentially. Four bar-tacked tabs give some options for ice tools or a foam pad for single-push climbs and the like. Randy made sure the tabs were big enough for carabiners also. Totally removable for summertime rock climbing.


More here on Michael's custom version:

http://www.farnorthclimbing.blogspot.com/2012/04/company-next-door.html

Saturday, April 7, 2012

Climbing packs part 3

"I have a seam ripper, a pair of professional sewing scissors, a hand awl and a Swiss Army knife. Generally the tools required to turn a production pack into a "alpine climbing" pack that I can live with."  db


That was a thought I have had on a regular basis from the '70s on.  Same thought that occasionally runs through my mind today on occasion.  I know better now (and have a deeper set of pockets) so instead I prefer to sit down and design a pack that I don't have to cut up.  Trick then is getting a skilled set of hands to make the thought a reality.

© rif, Aug 1969
Climbers: Rob Ferguson (photo by Pete Cartwright)
The basic kit for alpine climbing hasn't really changed in the last 50 years.  The smart guys getting things done, haven't carried more than 20% of their body weight.  As time has passed the gear has gotten more durable, warmer and much, much lighter.

What I used on Deltaform's Super Coulior in 1976 isn't any different than what I pack today for A-Strain.  Sure the gear has changed but the basic items, rope, tools, boots, hardware haven't.  We can climb faster (even old guys like me) and do harder technical routes with ease because of the new gear.  But the human powering the effort up hill hasn't changed much.  Smarter may be from the experience of generations before us but certainly no better than the guys suffering it out on the European North faces during the '30s.

Jack with a simple pack sans lid and his typical smile, 2009.

The reason I want to go down memory lane here is this blog series discusses climbing packs accessories.   What I am about to suggest as a  climbing pack and show you is not the norm.  Every climbing partner I have was at first extremely reluctant to steadfastly against using this style of pack.  They aren't for everyone and they aren't for every trip.

But with a little imagination and some thought you might find this is the best pack style you have ever used for actual technical climbing.

Canadian ice, 1978, no lid on Chouinard's Baltoro pack.

Below from Dow Williams, April 2012 on the Mnt. Project forums,

"hmmm, been climbing a bit...full time for the past 15 years, guiding, alpine V and VI routes, ice, rock, you name it....can't say I own a "leader" pack...is this something dead bird came up with to sell a new expensive pack that is suppose to make one climb better?

In any regard, keep in mind, you are only as fast as your second....don't load him/her down with a non-"leader" pack, whatever that might be and expect to move any faster because you have a cool "leader" pack on...a classic route where you need to use low profile packs is Beckey Chouinard in the Bugaboos...I have guided this route...and can assure you...that if your partner is not experienced enough to swap leads and is going to serve as a 2nd for the entire trip...you better make sure his/her pack is no more cumbersome to climb with than whatever this "leader" pack business is....or you won't make the route in a day which is much preferred....unless of course you want to carry a bigger (I presume non-"leader") pack and bivy."

Climbing is..."a thinking man's sport."  Dow has much of the details already covered above.

Remember the 20% rule.   There are no leader's packs because you carry a climbing sac that first, fits you.  The pack size is defined by your body size and what kind of weight you can actually climb difficult technical ground with.  You should build or pick out a pack that fits YOUR body size perfectly first.  Then you can climb with it loaded with as little as required or as much as you can realistically carry. 

This from my 'friend" Tom Ripley over on the UKC web sit last month.

"These days do you actually use any gear enough to wear it out though?
Or just buy the next gimmick when you got bored? "

Kinda a funny question coming from a 20 year old kid. (and no offense to 20 year old kids) So we will give Tom a little slack here. In my climbing career I don't think I have ever tolerated a "gimmick" and I am never bored. Most of my gear from the '70s I still own. Including my Chouinard FISH pack I still used when very long in tooth and well past needing to be replaced. There is a reason for that. Some gear is hard to come by and difficult to replace with anything remotely usable.

The original Karrimore Grimpeur in the first picture of this blog was used, abused and never replaced. Just as my FISH pack was used, abused and only recently replaced with the same. (or damn close anyway) As I said really good kit is hard to fine. Gimmicks..they come and go without hesitation or afterthought. Our young Mr. Ripley will given enough time in the sport eventually figure that out.

More here on the story of the very first Karrimore Grimpeur:

http://homepage.mac.com/inov8/Compass/karrimorimages.html
If you are not into really basic climbing sacks or want to learn about what I think is a better climbing sac stop here. The sizing and fit for a true climbing sack have been covered. The rest is again personal opinion. Likely $150 or so will get you a duplicate of the pack I use. IMO it is a good bet that it will be the best climbing sac you'll ever own. But there isn't much to them. And they don't climb by themselves.
But if you aspire to emulate this style of climbing in the mountains..... read on.


John Bouchard climbing on the Grands Charmoz, August 1975 photo by Steve Zajchowski.
The pack is a Karrimore.


"A rope, a rack, and the pack on your back, is Alpinism!"


To the uneducated eye the climbing sacks I use are really simple.  As I have said previous, simple sacs but complicated designs.   The packs show above are all the same basic design,  A single daisy chain stitched up the front to ease the strain of hauling the pack.  The pack is uncluttered so it hauls well.  The down side (if there actually is one) is everything needs to go in the pack and not hung from the outside.  Minimalistic indeed.  The lid is detachable on these particular packs.  There are two pockets in the lid plus strap on patches sewn to the top.  The main pocket in the lid will hold two, 1 liter water bottles.  The smaller bottom pocket it a typical map or guide book size.  The single lid attachment buckle on the outside is covered to protect it if you need to haul the sac.  The dbl Fastex buckles above the shoulder straps that latch on the lid from behind are not covered.  Velcro seals the lid between the shoulder straps in the "short" position.  The lid snugs down tightly above the Velcro in the extended position on an overly full sac.   I will interchange the terms *sac* and *pack* a lot from here on out.  A proper climbing pack to me is a "climbing sac".

All good to this point right?  And likely what is pictured above is as stripped a pack as most will ever want.  But it is not the pack I climb with generally.  This little internal pocket opened a lot of options and ideas for me to use a even simpler pack.  Funny how this all works. A tiny bit of design effort changed how even I looked at this decades old design.  And it changed the packs I climb with and has made them even more useful to me and simpler yet.


My ID, the car keys, the camera if it isn't in my jacket, some extra GU and a headlamp go in this pocket.  Spare socks or gloves sometimes and a hat as well when I think about it.  Basically anything I don't want "lost" and rolling around in the bottom pack.  The pocket is big enough...but not that BIG.

2 liters of water is most easily replaced with a stove.   Or just as easily carried in a hydration bladder internally.   So the importance of having a top pocket can be easily forgotten...then left behind all together.

So here is my current climbing sac.  Not to every one's taste for sure.  But something to think about when you decide a new "climbing sac" is required.   Built right you'll own it a long, long time..so make sure it is a design you can live with.

Full of ropes the pack weights in at 25#.  A full compliment of actual alpine climbing kit?  Right at 30#.  Just under my 20% self imposed 38# limit.


It should be no secret here at Cold Thistle that the majority of what I write is simply me slogging through the piles of gear I have an interest in and by doing so hopefully it enables me to make the best decisions and selections for my own use.

This three part series started because I was appalled at the pack fit and quality of some of my partner's packs.  Enough so that I have bought and given away packs.  It pays to remember that if you aren't soloing, your partner and his gear are actually a part of "your kit".

What I learned from this exercise it I want a really basic pack  Since it is what I use the majority of time anyway.  So last week I placed another order for a pack sans lid or any way to add a lid.   It is very similar to the pack pictured above just no Velcro or the extra set of straps to latch the lid down.  The daisy chain and lid tie down is simply bar tacked at the packs opening.   But other than that it is really the same basic alpine sac I have been using for 30+ years. Just a more complicated design.   Old habits die hard I guess.

Here is my new build sheet from Randy @ CCW:

Pack 1 OZONE 210d Spectra (Dane)
------------------

1. Custom sizing 21" back (+2.5")
2. Fish bottom pattern
3. No lid or attachments of any kind
   (-front daisy but without top strap)
4. pull down shoulder straps instead of "pull up"
5. main bag has a zippered "guide book" pocket...with a little clip for
keys?
6. thicker shoulder straps foam- 2" longer
7. Perlon haul loop
8. dbl rope straps across the top of the pack
9. half length extension with draw string
10. no double bottom

And the specs for my original CCW alpine sacs:

Custom sizing, 21"
FISH bottom pattern
2 liter+ water bottle size top pocket
2nd zippered pocket in bottom of the lid with key holder
Zippers reversed on the pockets for use on hanging belays
pull down shoulder straps instead of "pull up"
main bag has a zippered "guide book" pocket
covered lid buckle which protects it while being hauled
removable foam pad
oversize/thickness on the shoulder straps
Perlon haul loop which is easier to clip on and off the anchor in difficult stances
dbl strap patches on lid
dbl rope straps across the top of the pack
dbl bottom
10" extension with draw string
lid is extendable and removable
bar tacked daisy chain on the bottom of the lid strap

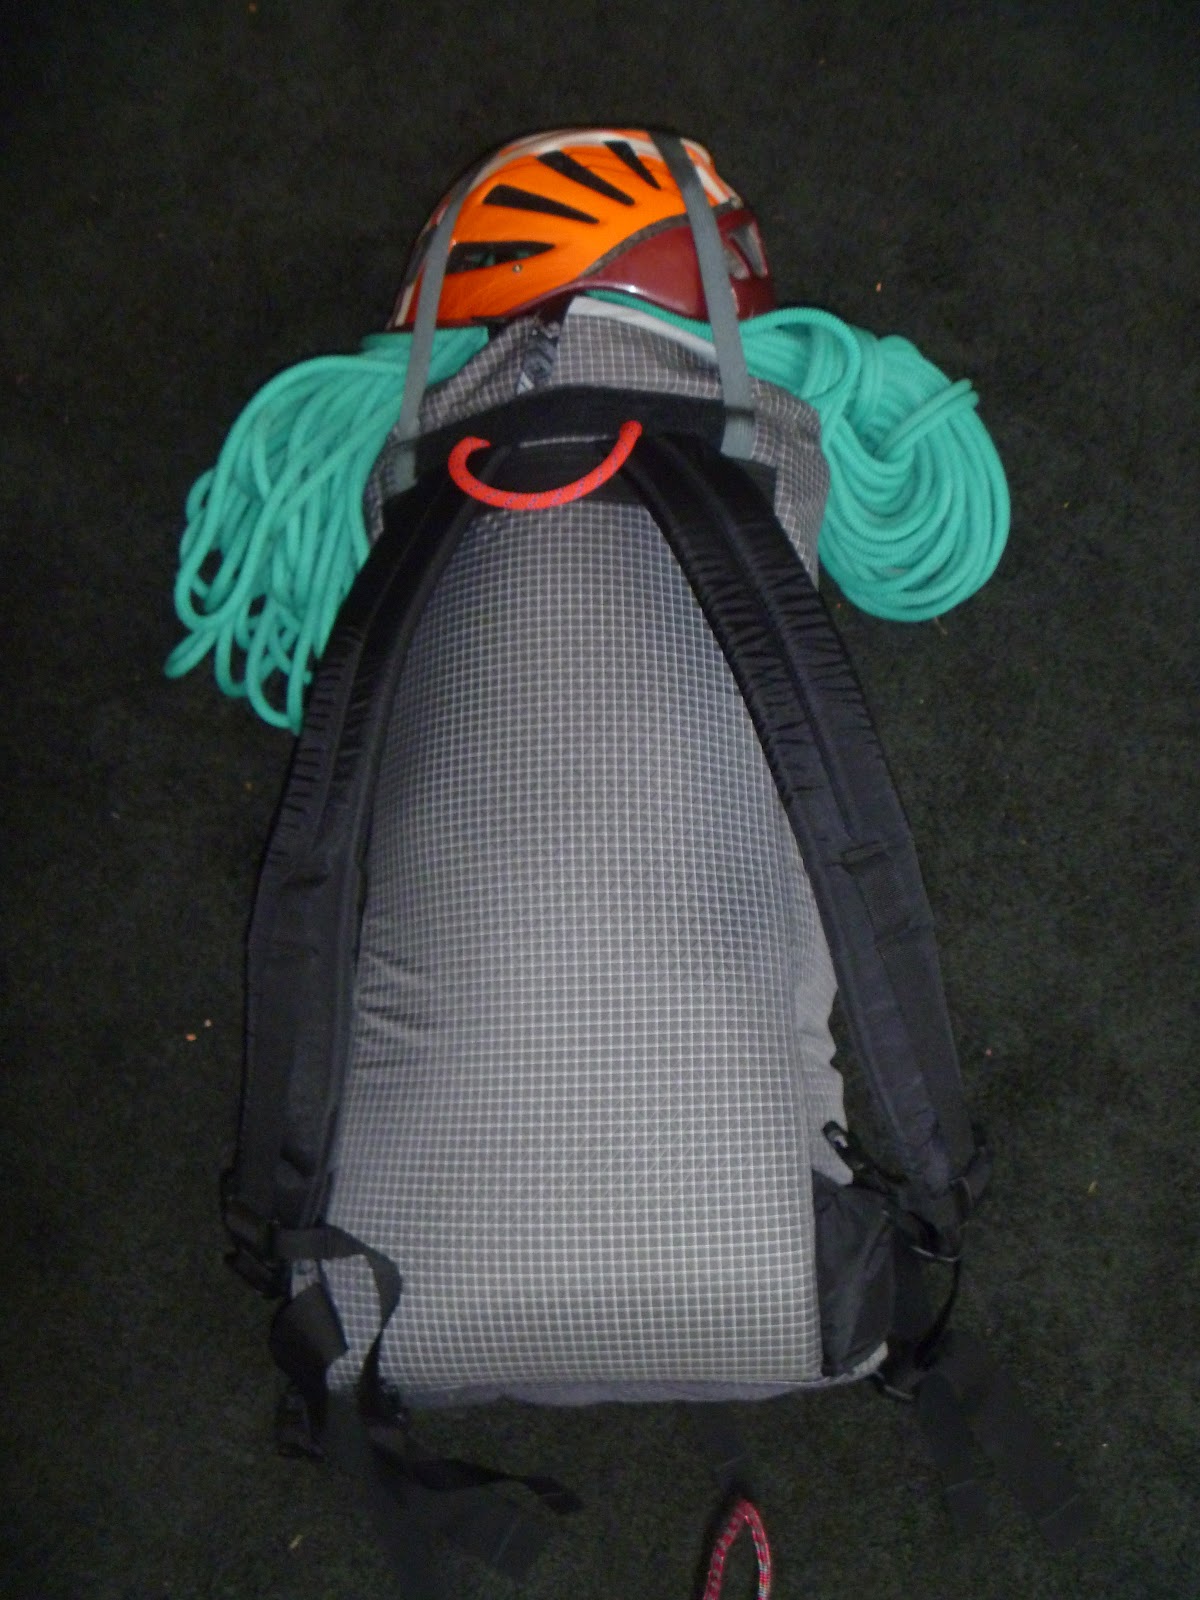
Finally for those interested.   I took my pack and loaded it with the typical gear I would take waterfall cragging or alpine climbing in Canada.  Loaded it a bit heavy @ what ended up being 35# even to make a point.  Typically I don't carry all the hardware and the rope.  Or this much hardware very often.  Everything pictured is gear that was sitting waiting to be put away from out last trip to Canada so not unrealistic either.    Helmet or rope and may be both could just as easily go inside the pack.


ready to close it up and strap on my 1/2 twin ropes and helmet

above and below:
Not my best pack job but easy enough to carry


Here is what went into the loaded  pack pictured above:


13 food and GU packs
2 dozen Advil
Metolius gear sling
12 Grivel Helix short and med screws and one 22cm in a cover and with caps intact
8 sewn QDs and 16 biners
Locker and Reverso
6 cams various sizes form 1" to 3"
4 Large stoppers
5 pins, knife blade to 3/4" baby angle
Petzl harness
Grivel Umbilicals
2 ?
2 head lamps
2 spare battery packs
3 lighters
Snow Peak stove
med MSR fuel canister
GSI cook kit
spare scarf and Buff
2 spare gloves
one 60m Beal Ice Twin
Patagonia Knifeblade pullover
Patagonia Nano Puff pullover
RAB Generator Alpine Jacket
1 liter Nalgene bottle
a pair of Petzl Dartwins
a pair of Petzl Nomics

James Blench on the hourglass of Deltaform, early '80s.
Gregg Cronn photo